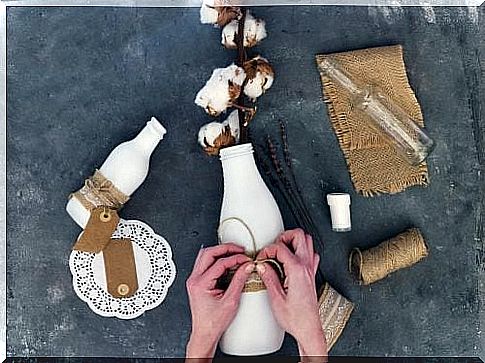
Challenge Your Creativity With These 7 Original Ideas To Decorate Your Bottles
Reusing and customizing bottles to decorate your interior is an ecological activity that allows you to take care of the environment. What’s more, this is an easy and fun process that will allow you to test your creativity.
Every year the amount of waste increases, and so does the contamination. The bottles are however easily recyclable.
This is why recycling campaigns are important, because they inspire us to make a change in our homes.
In addition to recycling our household waste, we can also reduce or reuse it.
Reusing an object means giving it a new function that is different from the function for which it was created.
In this way, we prolong the use of objects and delay their disposal, thus helping to reduce the volume of waste.
The impact of this action on the environment is direct and positive. In addition, it allows you to decorate your interior with original objects created by yourself.
One of the most reused objects is the glass or plastic bottle because of the many possible uses.
Before throwing away those bottles that you don’t use, take a look at our list of ideas to customize them and add a special touch to your interior.
1. Bottle decorated with paint
 With this technique, you will use your imagination and you can choose the style that you like the most.
You can choose a childish, folkloric, or even a Christmas motif for the holiday season! The material is really inexpensive, and it will make you a charming decorative object for your interior.
Material:
- glass bottles
- nail polish or acrylic paint
- Scotch
- pair of scissors
- paint brushes
Instructions
- The first step is to thoroughly clean the inside and outside of the bottle.
- Using hot water, remove the label and any glue or adhesive residue.
- Once clean, use the tape to delimit the space that you will paint later. If you want thinner lines, you just need to cut the strips of scotch tape.
- Choose the color of nail polish or acrylic paint you want to apply to the bottle, and pour some into a small container.
- Using a brush, paint the space delimited by the strips of tape.
- Let dry, and if necessary, apply a second coat.
- When the paint is completely dry, remove the tape.
And here is a beautiful bottle decorated to your taste that you can use as a vase or as another decorative object!
2. Bottle decorated in a slate style
This is a fun and original technique that will allow you to write and erase anything you want on a bottle.
You can even write in your own handwriting the names of your family members, or a message, or even a good joke … The choice is yours!
Material:
- empty glass bottles
- slate paint
- brush or roller
- chalk
Instructions :
- Wash the bottles and remove the labels.
- Add several coats of slate paint. Let the paint layer dry before ironing a new layer. Use the brush or the roller depending on what seems easiest to you.
- Once the paint is completely dry, you can use chalk (white or colored) to write on the bottles.
- To erase the chalk, you can use a damp tea towel or napkin.
- These bottles will bring a unique touch to your interior. Better yet, they can serve as a vase in which you can put flowers, branches, or even candles.
3. Bottles transformed into magic lamps
Here is a magical decorative object for your bedroom, your terrace, or any other space in which you want to bring a touch of light.
By putting a light garland inside a bottle, you will get a lamp that emits low light, creating a romantic and welcoming atmosphere.
Material:
- thick glass bottle, preferably a wine bottle
- light string
- masking tape
- small drill
- a piece of sandpaper
- safety equipment for the drill: goggles, mask and special building gloves
Instructions :
- Remove all labels from the bottle to achieve a perfectly smooth surface.
- Using the masking tape, glue two large strips to the bottom of the bottle on one side. This is used to mark the location of the hole that will be used to pass the light garland. Add a strip of adhesive on the strips already glued.
- Being very careful and taking into account the safety measures, start to drill a hole about 2 inches in diameter. Do not exert great pressure on the bottle, and remember to pierce over the adhesive strips.
- Once the hole is made, use the sandpaper to remove any roughness and sharp edges from the hole.
- Rinse the bottle with water, and let dry to remove all the pieces of glass.
- Then, gently introduce the light garland through the neck of the bottle, starting with the part of the garland that contains the card. You can use a Chinese chopstick to gently push the garland to the bottom.
- The goal is to remove the plug through the hole so that the whole garland is inside the bottle.
If these steps seem complicated to you, you have the option of not drilling any holes. You will therefore have to introduce the light garland through the neck of the bottle, leaving the end of the garland containing the plug for the end to be able to connect it.
4. Bottles decorated with Japanese scotch
Japanese scotch is in fashion, and is very practical in the world of decoration.
You can find it at any craft store. You will most certainly find that there are many different designs and sizes available.
Material:
- glass or plastic bottles
- colored Japanese tape or with the patterns of your choice
- pair of scissors
- mesureing tape
Instructions :
- Rinse the bottles you want to decorate and remove the labels.
- With the tape measure, measure where you want to place the Japanese scotch tape.
- Cut a piece of Japanese tape according to the measurement noted previously.
- Repeat the operation as many times as you want. But make sure that the result is harmonious!
- You can even cut the tape to get thinner strips.
Once decorated, you can use the bottle as a decorative object or as a container for your makeup brushes, pencils, among others.
If you are using a plastic bottle, we recommend that you add weight by inserting small pebbles inside the bottle until it is one-fifth full.
5. A photo holder with bottles
 Family portraits are never lacking in an interior.
The following technique will allow you to diversify your photo holders with an ecological and ingenious touch that will surprise all your guests.
Material:
- glass bottles of any size
- photo printed on photo paper
- pair of scissors
- cork stopper or other type of stopper
Instructions :
- Wash bottles well and remove labels.
- Roll up the photo you want to use making sure that the photo part faces outward (visible part).
- Gently insert it into the bottle and it will adapt itself to the container.
- If it doesn’t fit well, reduce its size with a pair of scissors, or choose a smaller photo.
- The idea is that you can cap the bottle with a cork or some other type of stopper in order to protect the photo from external agents.
You can choose a color photo, but sepia or black and white photos also look great as it gives an old effect.
You can also add other decorative elements, such as scotch tape or even knots.
6. Bottles decorated with thread or wool
A simple glass bottle can become a perfect vase for the living room, a decorative kitchen accessory, or a precious centerpiece with other decorations for a special occasion.
With threads and colored wool you can transform your bottles in a few minutes and obtain an incredible result.
Material:
- glass or plastic bottles
- wool in different colors
- silicone gun or glue gun
- pair of scissors
Instructions :
- Wash bottles well, remove labels and allow to dry well.
- Put some glue on the bottom of the bottle and start gluing the wool or yarn.
- From there, roll upwards, adding a little glue every now and then to secure the yarn or wool.
- You can use several colors of yarn or wool. If you choose this option, cut the first piece of wool or thread, and glue it so that it does not come undone. Where the end of the yarn or yarn is, glue the end of the next yarn or the end of the next yarn, and wind up again.
- Continue to roll until the entire bottle is filled.
You can of course add other decorative elements such as bows, plastic flowers, or even buttons. Unleash your creativity!
7. Bottles decorated with colored sand
You will be amazed at how easily a glass bottle can become a pretty beach vase with little material!
Material:
- transparent glass bottles, preferably with an exotic shape and a wide neck
- colored sand
- brush
- cork stopper or other type
Instructions :
- Wash the bottle thoroughly and remove the label.
- Once the bottle is dry, pour the sand inside.
- Using a Chinese chopstick or the end of a brush, distribute the sand as you wish.
- Continue to add colored sand as you wish.
If you can’t find colored sand, don’t worry. You can do this yourself with sea sand and vegetable dye.
When you have the different colors of sand, which must be dry before use, follow the instructions above to decorate the bottle.